Archive for July, 2010

Sharing a recipe… Blueberry Pie (and GIVEAWAY!)

Ok, I don’t want to toot my own horn here…but TOOT!!!

Fresh blueberries are in season right now, and if you’ve read Sandy’s Spot for more than a week, you know my love for all things homemade.  Well, there’s kind of a reason for that…  You see, I’m  gluten free (and, for the most part lactose free).  It’s so refreshing to eat something when I know I’m not playing russian roulette with my digestive tract.  So…homemade things and me are bff’s.

So, when my mom asked me if I wanted a few 5 lb. boxes of fresh blueberries, I jumped on it!  The first box was enjoyed as a fresh snack as well as a bring-a-dish-to-pass side at a family event.  Right now, they’re so fresh and plump.  Mmmmm.

We had a second 5 lb. box that was starting to sit.  Apparently, we’d had all the raw superfruit fiber our bodies could handle.  🙂  And I wanted something sweet.  So, half went into the freezer, and half…well, became this little beauty.

So, without further adieu, here’s how I made it:

For the crust, you’ll need:

  • 8-10 pitted dates ( I found them in the fresh produce dept. at Family Fare)  They had pits in them, but it’s so easy to remove!  Simply rip them in half and pull out the pit.  Waalaa…
  • 1 1/2 cups of pecans.  I’m not sure what the recipe actually called for, but this is how much I used.
  • 1 TBSP cinnamon
  • pinch of nutmeg
  • coconut oil

I started by putting the pecans and spices in my food processor (my newest kitchen toy!!!!) and processing it down until it looks like a meal.  Then I added the dates and pulsed it until they were cut up, then processed until they were cut up and blended well.  Then I added the coconut oil.    I can’t remember what the recipe called for exactly (can you tell I’m not a exactly-by-the-recipe gal?), but I added about 2 TBSP of oil.  Basically, you need to make the mix a little damp so it all sticks together.  When finished, pour into your pie plate and press out evenly.  It should look like this:

While you’re making the filling, I put it in the refrigerator to help it set.

Ok, the filling…the yummy part!  Who am I kidding- it’s all yummy!

You’ll need:

  • 3/4 cup white sugar
  • 3 TBSP cornstarch
  • 1 pinch salt
  • 1 cup water
  • 4 1/2 cups fresh blueberries (I ended up using close to 6 cups- because I wanted to use it all up, and it worked just fine!)
  • 1 TBSP butter

In a saucepan, combine the white sugar, cornstarch and salt.  Stir in water and 1 cup of the blueberries.  Cook and stir over medium heat until thick.  Then add the butter, and stir it in until melted.  It took about 10 minutes for mine to go from this:

to this:
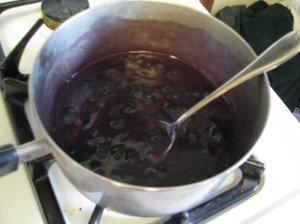
Then, remove from heat and allow your mixture to cool approximately 8-10 minutes.  When cool, add the rest of your blueberries and gently mix the “glue” thoroughly throughout the fresh berries.  Pour into crust.  Allow it to set up for 2-4 hours in the refrigerator.

When you’re finished, it will look like this:

Actually, when you’re husband is finished, it should look like this: 

Not only are you using fresh in-season produce, but it’s also a nice cool (no oven needed!!!)  way to let the (older) kids help stir and throw things into the food processor. 

Now, for the giveway.  I have two tickets to Fredrik Meijer Gardens up for grabs!  To enter, leave me a comment telling me your favorite fresh summer produce, and what you make with it!  I’ll start:

My name is Sandy, and I love blueberries!  I make an awesome fresh blueberry pie!

Contest ends Thursday, August 5 when a winner will be chosen at random.

Comments (19)

Letter…what?!?!

Last year, our little family was looking for a few ways to:

1.  Have fun

2.  Get more exercise

3.  Save money

Enter: Letterboxing

It’s like geocaching…only cheaper…and on a much smaller scale.

But still tons of fun.

You can start by going to www.letterboxing.org

There’s LOTS of information there.

Here’s my version:

1.  You’ll need a compass (and you’ll need to know how to read said compass).  I purchased ours at Wal-Mart of $8.

2.  You’ll need a family stamp.  I combined a few stamps that I already had in my craft boxes to make our family stamp.  I looked through some books and noticed that they come in all shapes and sizes.  One person used their thumb print and turned it into a little person, one person used their signature…you can do what you want.  Bringing your own stamp pad is not always necessary, but helpful.

3.  You’ll need a pad of paper.  ( I purchased 2 composition books- with 3/4 of the page dedicated to words and a blank spot on top.   I’ll explain why in a bit).

Total spent: just under $10

I went to www.letterboxing.org and found a “local” box that sounded easy enough for our first outing, printed out the clues, packed a backpack with diapers, bug spray, snacks, water, and the above listed items, and off we went.

It was about a 40 minute hike, and a beautiful day.  Other than a small altercation the Mr. and I had about the meaning of two clues, we made our way throughout the terrain and found our destination.

Here’s Adam doing his portion of our family stamp.  The boys were super excited to find the “treasure.”  I took the stamp from inside the letterbox and put its impression on both books.  Why two books?  Well, I want to document on one (in my words), and I want the boys to be able to document on the other one.  Adam was very excited to write the story of this treasure in his own book.  It got him very excited about words, writing and story telling- which is not usually his cup of tea.


There are quite a few letterboxes in our area, and what’s even better, this is a hobby you can take on the road with you if you’re traveling!  They’re all over the country!

Helpful hint:  Putting it off until close to dinner time may result in pictures like this:

But closer to bedtime may result in pictures like this:

Or vice versa…  🙂


Leave a Comment

You are my sunshine, my only sunshine..ok, not my only one…but one of the two…

Craft time!!!


I have a confession to make:

    I am a sucker for anything that has my children’s handprints on them.

At first, I was like, “meh…cute craft.” 

And into the craft pile it went. 


Now…looking back?  They’re my absolute favorites!  Adam is 6 now, and has grown substantially over the past 18 months.  I seriously think he already has man-hands.  So, any chance to check out how small* his hands once were…well, its almost as good as smelling a baby’s newborn head.  Almost.  🙂

*Yeah, he never really had small hands. 

Even as a newborn, they were pretty large. 

But, still, much smaller than they are now.


For this craft, you will need:

  • yellow, orange, construction paper
  • glue
  • scissors
  • paper plates
  • yellow paint
  • marker
  • pen


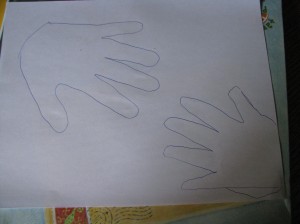
1.  Start by tracing your child’s handprint on a plain white sheet of paper.  This will serve as your template.  This is the pretty time-intensive part.  I traced their hands onto another piece of paper and let them cut that one out, but both boys quickly lost interest in that…so I used the template and cut the rest of them out while they painted.

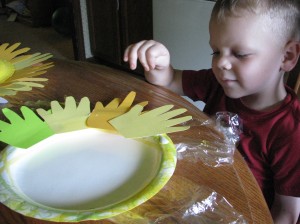
2.  Turn the paper plate over and let the kids paint the entire backside in yellow.

( I line my table with saran wrap while they paint.  Saves my table, saves my sanity.)

If they don’t 100% cover every last bit of white, that’s ok.  It will still look so sweet in the end.


3.  Once the glue is dry, haul out the marker and ask the kids to either draw a smiley face on it, or to draw their own face.  I love Adam’s self-portraits now-a-days.  It’s fun to see what he sees in himself.  🙂


4.  Turn the plate over so the paint side is down.  Run a line of glue along the rim and start laying the hand prints on one at a time.  Overlapping them results in a really fun look.

I had a few left over papers in orange and green along with a few different colors of yellow.  The more variety of color you use, the more fun your sunshine turns out to be!


5.  Once you have the first ring-around-the-plate done, if you have left over hands, keep going!  The more overlapping, the better!


6.  Once dry (approximately overnight), turn over and display proudly.


So, when I sing, “You are my sunshine”,

what I really mean is “You are one-of-my-two sonshines.”


But, they make me happy.  🙂

Leave a Comment

Baby, it’s HOT outside!


Yes, in case you’re wondering…I do have Christmas songs in my head.

And I do alter the lyrics to fit the actual current climate.

Cause I can be funky like that.  🙂


Anyway….

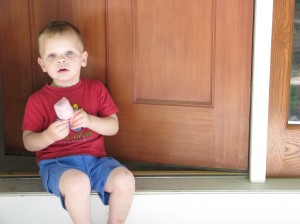
Over the past year, I’ve tried to take steps to avoid a lot of processed food in the house.  There’s no high fructose corn syrup here, and as few dyes as I can manage.  (Although I do give in on that second one a little more frequently than I’d like to admit).  The other day, the boys and I were in the store looking for frozen treats to help us stay cool, and I noticed that they either:

a) Had HCFS in them

b) Had HCFS, sugar and tons of dyes in them

c) were natural, but horribly expensive


What’s this frugalista to do?

Get creative, of course!!!

Here’s a few of my favorites (with an awesome recipe at the end):

Go-gurt.

Freeze it up, let them eat.

Total convenience thing here.

But added dairy and protein to their diet, and they think they’re getting dessert.

I’m a fan of that.  🙂

Bonus:  if your elementary school is into Box Tops, this one is double duty!!!

Another one along those lines:

Yoplait Trix yogurt (comes in a 6-pack) has these need little sticks (one in each pack) glued to the top of the carton.   Stick them in, freeze, and enjoy.

Again, this is merely for convenience sake, but much healthier than the popsicle alternative.

Warning:  These take a ridiculously long time to eat for little ones, so give yourself a half hour…or two.  🙂

Ok, now the next few are more up my alley.

Cause I love all things home-made or made from scratch.

Got watermelon?

If you’re like me, you purchase a whole watermelon, eat a few pieces and the rest goes to waste.  Oh how I loathe throwing away produce after it sat too long!!!

Anyway, take the rest of the watermelon (seedless, of course), cut it off the rind, stick it in your blender and liquify.  If you need to, add 1 oz. of water.  BUT, if you want to punch it up a bit, add 1-2 TBSP of maraschino cherry juice.  Once it’s all liquid, pour into ice-cube trays.

When totally frozen, add a few ice cubes to some ice-cold lemonade.  Not only will the cubes add some awesome flavor punches, but the watermelon adds some needed fiber to our diets!

Got grapes?

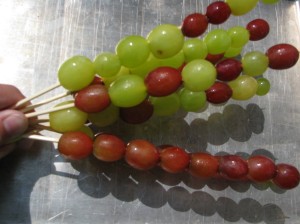
I love frozen grapes.  I keep a small bowl of them handy in my freezer for when my sweet tooth attacks.  They take forever to eat, and are so sweet- they taste like candy.  When Meijer and Family Fare had these on sale last week, I went a little crazy purchasing them.  (In my defense, we were going somewhere last Saturday that was “bring a dish to pass.”  I brought fruit and dip…).  We had some left overs, and I didn’t want them to go to waste.  So, Colin and I had fun putting them on bamboo skewers.

This was also a fun time to talk to Colin (2) about patterns!  This was a really fun kids-in-the-kitchen moment with him.  Note:  when you go to freeze them, place them on a sheet and make sure they aren’t touching.  If you freeze them in a clump, they will likely stick together.

Ok…this next one is my absolute favorite.  It’s a little time intensive (like 10 minutes), but so fun, and versatile.

Fruit popsicle

For this, I used 9 cleaned and  hulled strawberries (or about 1/2 of the container), one ripe banana,

1/2 cup orange juice, 2 TBSP honey (locally harvested) , and one container of Fage Greek Yogurt.  (You could use 2/3 cup milk instead, but I wanted to use this up before it went bad…and I wanted to pack some more protein into the popsicles!)

  Note:  if you don’t have fresh fruit in the house, you can use frozen too!  Raspberries, blueberries, cherries, mangos, it all works well in these!!!


Place all the above ingredients in blender and liquify.  You may need to scrape the sides once or twice…especially if you use the yogurt.

If you have popsicle makers, these will work perfect. I got these at the Target One Spot two years ago.   If not, you can use dixie cups and put sticks in them after you’ve had them in the freezer for an hour.


If you have any mix left over, feel free to pour them into your ice-cube trays.  They’re fun to add to milk at dinner time!

Or…you know, tell your husband it’s a protein smoothie…

…in which case, he’ll drink it right from the blender, and it will be gone in 30 seconds.

Enjoy!!!

Comments (3)

My boys ate octopus for lunch!!!


Adam had swimming lessons this afternoon.

I decided to capitalize on them and make a theme day around water.


This morning we made pancakes.  Thinner batter, thicker batter…all done with water.  For the record, they enjoyed the thinner batter better.  (Wow, say that 10 times fast!  thinner batter better, thinner batter better…oye.  I digress)


We played with ice cubes.  Letting them melt.  Then letting them evaporate.


I also talked to them about how water makes our plants grow.  So, they helped me water all the plants.  (Hey, I can work these lessons to my advantage too, right?)


Time for lunch.  Thought we’d have a little fun.

What you’ll need:

  • hotdogs
  • pot of hot water on the stove (almost boiling)
  • sharp knife
  • cutting board
  • corn cob skewer

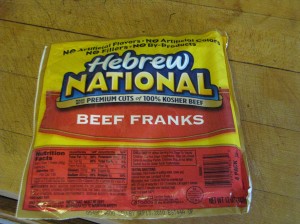
This is the kind of hot dog I use.  Yes, it’s not exactly cheap.  However, my mentality is, “if I’m going to serve my boys junk food, it might as well be high quality junk food.”  So, when it comes to hot dogs, I’m a little high maintenance.

However, these are cheapest in the 4-pack at Costco.  Two month ago, there was a coupon in their flier making each package 2.09.  This is much cheaper than the $4.99 I’ve seen out there.  Biggest benefit here: no fillers.  6 grams of protein per dog.  Talk about high quality junk food!


Ok, I’m off my soap box now.  🙂

Start by filling your pot about 2/3 full of water and start heating it on the stove.  That way, when you’re ready for it, it’s ready for you.

Get your cutting board and knife out.

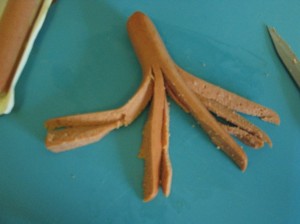
Starting at about 1/3 of the way down, cut the dog in half.


Then turn it, and cut it in half again.

You now have four legs.  An octopus has eight legs.  So, each of those 4 legs needs to be cut in half again.  It’s easier to do each one separately.  I put the casing side down on the board and just cut along the ridge-line.

Next, your water should be simmering by now.

Place the octopus’ (octopi???) in the jacuzzi.  Let them cook in there for about 5 minutes.


I used a corn cob skewer to pull them out by the “meaty” non-cut section.  I tried to catch them on the side- so the two poked holes would look like little eyes.

The boiling water curled their little hot dog leggies up, and now you have two octopus to eat for lunch!


Enjoy!


Comments (3)

Successful Garage Sale Shopping…Kiddo Version (Garage Sale Series, Part 2)

Note: This is a repost of a great article from the Old Sandy’s Spot blog.
I can’t tell you how many times I’ve heard, “It’s just so hard to shop garage sales with the kids in tow.”

Ain’t that the truth!

I must say that this is also an anxiety of mine.

I can just see one of the boys picking up some heirloom vase that someone’s Aunt Edna gave them, and then the boys will smash it to smitherines…

…and I end up paying for it.

No, really…we need to work on not touching everything.

But a few strategies have helped me get to some awesome sales, and snag some awesome finds.  I’m hoping these will help you too.

Picture
1.  Have a game plan.  Don’t go out shopping all willy-nilly.  Find the sales with items you’re looking for and hit those first.  If there’s left over attention span and good will (on the kids parts), hit a few that may look good later.

2.  Give them a list of things you are looking for.  This gives them a job and makes the garage sale shopping experience feel more like a treasure hunt than a chore.

3.  Divide and conquer.  I have a friend on the SW side of Grand Rapids, and I live on the SE side.  We each have a list of things that we are looking for.  If she sees something I could use, she’ll either call or text me and I can pay her back later.  She’s snagged some great GAP jeans for Adam!

Picture
4.  Team up with a friend.  I have a few friends who are GSB’s.  (Garage Sale Buddies).  Twice a month they team up, and pile all five kids into one van.  They have a DVD player for the kids to watch movies, and they pack snacks and travel games.  Each lady takes turns getting out of the van while the other quickly looks through a sale.

5.  Find neighborhood sales. Have you noticed that the calendar portion of www.grkids.com has neighborhood garage sales?  Yeah, these are pretty awesome.  You can park the car once, pull out the stroller and walk the neighborhood.  This eliminates all the in-and-out of carseats, and the fresh air could do us all some good.  *Don’t forget to bring some snacks!  Keep those pudgy little fingers busy and their tummies full.  Nothing screams, “YOU’RE NOT GOING TO HAVE A GOOD TIME!” like a kid with low blood sugar.

6.  Give the kids money.  Oh yes….I am soooo not above bribery.  While I do believe in the power and awesome-ness that goes with letting my sons earn their own money, I’m also willing to do a little *bonus* pay for mommy’s sanity.  I usually give each boy $1 to do with what they choose.  If they choose to bring more of their own money along, that’s fine too.  At the end of the day, if they haven’t spent the dollar, I allow them to put the entire thing into the spending jar for later (instead of splitting it up like normal).

Picture
And last, but not least…when all else fails?

7.  Leave them home with daddy or a sitter.  🙂

What are some of your successful strategies for garage sales shopping with kids?

Share

Leave a Comment

A Hidden Gem…The Outlet!

Note: This is a re-post from the Old Sandy’s Spot Blog
A friend of mine told me about a little hidden gem, and I had to go check it out.

It’s a budget conscious crafters store!

It’s called The Outlet.

Ever hear of it?

Picture
{photo credit}

It’s situated near downtown Grand Rapids at 1534 College SE in an old industrial park.

Picture
{photo credit}

They have funky hours:  Thursday and Friday 9-5 and Saturday 10-3.

There’s a mish-mash of items ranging from scrapbooking, stamping, sewing notions, kids crafts, seasonal items, Ott Lights, Cricut machines and cartridges, paint, floral foam and tape, and some home decor.

It’s really neat to look through everything, but honestly, if you go with something specific in mind you probably won’t find it (unless you already know that it is there).  When you go there for the first time, keep an open mind.  Find a crafty gem and create art around it.

For example, when we went, their kids section was an additional 50% off.
I found this kit for a total of $3.25.

Picture
For $3.25, 200 pieces of misc. craft items is a good buy.  There were directions in the box for specific crafts, but I just opened the box up and set the boys loose with some glue, tape and scissors.

The most impressive sections of the store (in my opinion) were scrapbooking and organization.

Picture
{photo credit}

They were the two departments with the biggest variety and the best discounts.  I am forever looking for ways to organize all my scrapbook paper and scraps.  Then I found this:

Picture
By the time I left, I had four items in my hands:  The fabric hangers (two hangers in one package!), the kids craft kit, a Fiskars rotery cutter and an extra-large cutting mat.

I spent a total of $21.

Yes, for all four items.

Ok, before you plan your first venture down to The Outlet, you may want to check out their facebook page here. If you become a fan, you’ll receive status updates of their weekly specials.

Also, when you go, make sure to tell them that its your first visit!  They will give you an additional 50% off the regular price of one item AND they’ll give you another coupon for 50% off your next visit.

Happy Bargains!

Leave a Comment

Hello again! and some housekeeping. :)

Hey friends, a little update here:

1. I’ve missed y’all! We’ve been MIA the past few weeks due to sickness, a self-imposed 2-day family technology black-out,  and then a fast evacuation of our home due to some pretty very nasty lacquer fumes (we’re doing major renovations to our house). Thank goodness for parents who are willing to put us up for a few days at a moments notice!  (Yes, literally a moment: “Hi mom, what are you doing?  Can we come over?  Can we stay until Friday?  or maybe Saturday?  Yeah…we’re in the van right headed your way now…and I forgot Colin’s shoes ’cause we left the house so quickly.”) We’re home now, and back on track! Expect to hear from me again soon!

2. A few of you emailed me stating that you couldn’t get the link on the last post(theme days) to work. I’ve fixed it. I hope you find it as useful to you as its been to me!

3. Do you remember my post about The Store? The one where I found the craft kit for $3.25? Yeah, found the EXACT SAME kit at Cascade Meijer. Guess how much it was….$9.99!!! You can see more information on The Store by going to the Old Sandy’s Spot and scrolling down a bit (read: alot).  It’s these kinds of realizations that make me stand a little taller when I shop.  🙂

4.  Can you believe that summer is 1/3 of the way over?!?!?  Are you using the grkids calendar or the vbs information?  It’s full of fun goings-on!  Perhaps we’ll see one of you out and about on the town! 

5.  Believe it or not, we’re going to start seeing Back-to-school sales in our Sunday circulars.  I know…I’m not ready to think about it again either.  But, if you’re on the lookout for classes or preschool, now is the time to start thinking about, and budgeting for, this fall.  Did you know there’s a spot in grkids just for looking into learning?

6.  Ok, I have some fun with food and fun summer craft ideas coming up soon.  Stay tuned!

Leave a Comment

Theme Days

“What do you do for a theme day?”


Many of you (read:6) wrote to me asking me about the theme days highlighted in our Summer Fun Jar post.  And while I had planned on showing you all what I do for each theme day, I realized that “It’s already July!”, and perhaps you want to come up with some ideas of your own for theme day- and plan age appropriate activities for your own kids.  So, here’s a few ideas to get you started and let your own imagination take over:

– I use this site ( http://www.first-school.ws/themes.html)  all the time.  At least twice a week I reference it for ideas and printables.  There’s crafts, printables, and even bible references to certain topics.

-I try to at least have two hands-on activities for each theme.  One printable sheet is enough for my 2 year old, 2-3 for my 6 year old.

-I try to keep the ideas of the theme’s in their world.  For example, on water day, we took an ice cube, let it melt in a pyrex dish, and then heated it.  This way, they could see and “feel” solid, liquid and gas water.

– The library is AWESOME!!!  The resource staff at any KDL library is an endless trough of information.  They are great at showing us themed children’s books.

– Have fun with food!  On colored theme days (red, orange), I take full advantage to show the boys fun (new!) foods that go with our colored day.

– Don’t be afraid to make it a theme weekend, or theme week.  The water theme is one of our favorites.  We’ve had 3 water-days this summer so far.  🙂  Visits to the water parks and squirt gun fun never gets old.  Colors are also a favorite in our house.  I cannot tell you how many red-shirt days turn into red-themed weeks.  ( Although I’m starting to catch on that its more of an excuse to eat red popsicles than anything else- I’m on to you, boys!)

Comments (1)